 CHARCOAL DRAWING WITH PHOTOSHOPHere’s a tutorial on how you can apply charcoal drawing effect to your photos using photoshop;
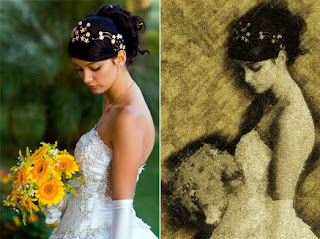
Step 1. Open your image in photoshop (ctrl-o). I’ll be using this beautiful bride photo by papaleguas.
Step 2. Add new layer (Shift+ctrl+N), let’s name this layer ‘paper’ and fill this layer with the desired color of your charcoal paper. Mine is #c5b88f
Step 3. Copy the background layer, place it on top of the stack of layers, then apply ‘glowing edges effect’ (filter > stylize > Glowing Edges Filter). Experiment with the sliders in the dialoque box to your taste.
Step 4. Now invert this layer (image > adjustments > invert) and make it b&w (image > adjustments > desaturate) to create black and white drawing.
Step 5. Set the blending mode of that drawing layer to multiply. Here’s what you should come up to.
Step 6. Copy your background layer, desaturate it (image > adjustments > desaturate) and place it on the top of your layer stack, and add some noise to this layer. (filter > noise > add noise > monochromatic & gaussian). Set the opacity to 75%.
Step 7. Add a layer mask on that layer (layer > layer masks > hide all), select the charcoal large smear brush and paint with white on the mask to reveal the charcoal specks.
Step 8. Select the layer mask, and apply motion blur (filter > blur > motion blur). Still on the same layer mask, apply crosshatch brush strokes (filter > brush strokes > crosshatch).
Step 9. Select the paper layer, and fill it with pattern (new fill layer > pattern). You can choose any pattern you like. I just chose the charcoal flecks pattern. Then change the layer blending mode to multiply.
Step 10. Copy your color layer, and place it on top of the stack of layers, change the layer blend mode to ‘color’ and from here you can add a curve adjustment layer to increase the contrast, play with the color balance and so on.. Here’s my final result; Have fun!
See also : Photoshop Tutorials
Special Images from :http://www.dphotojournal.com/images/tutorials/charcoal/charcoal-drawing-photoshop.jpg
Read more :http://www.dphotojournal.com/charcoal-drawing-with-photoshop/.


